Gold Bollinger Bands: Distinguish Price Dispersion from a Reversal Signal
Calculate illustrative bands, bandwidth and percent-B while separating price-level dispersion from return volatility and probability claims.
Specify the series and the estimator
Bollinger-style bands place an upper and lower boundary around a moving average using a selected multiple of standard deviation. The exact source field, averaging method, window, deviation convention and offset determine the result. A standard deviation of price levels is different from the return-based volatility studied in lesson 45. It describes dispersion of the selected prices around their average, in price units. Record the implementation rather than assuming every platform uses the same denominator or initialization. A familiar indicator name does not settle those choices, particularly when a custom script changes the defaults.
Work through a fully specified toy window
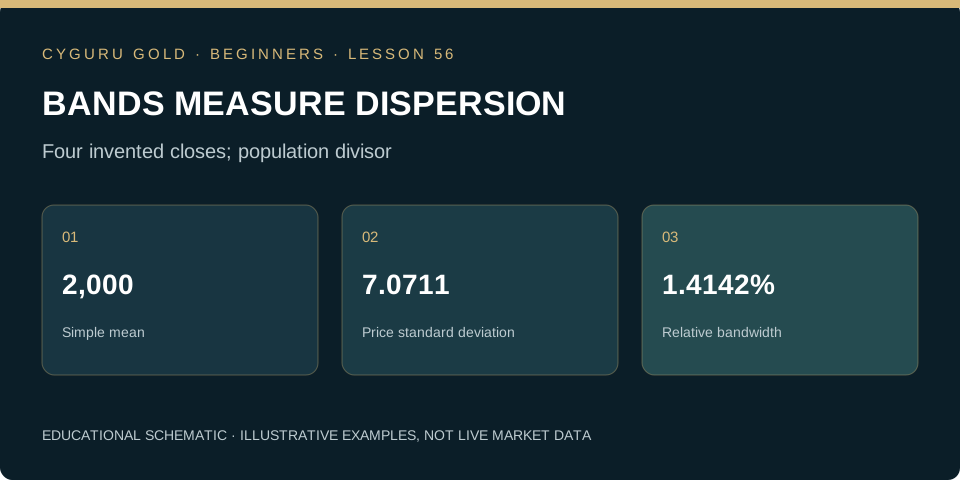
Take four invented gold closes: 1,990, 2,000, 2,010 and 2,000. Their simple mean is 2,000. Squared deviations total 200. For this teaching example, use the population divisor of four, giving variance 50 and standard deviation approximately 7.0711. At a multiplier of two, the upper band is approximately 2,014.1421 and the lower band 1,985.8579. This short window makes the arithmetic inspectable; it is not a recommended production setting. A sample divisor of three would produce different bands. State the divisor explicitly before comparing the worksheet with a chart or claiming that its output is incorrect.
Measure position and width separately
Percent-B can be defined as price minus lower band divided by upper band minus lower band. At price 2,010, the example yields approximately 0.8536. Values above one or below zero are possible when price lies outside the bands. Bandwidth can be defined as upper minus lower divided by the middle average; here it is approximately 1.4142%. These measures answer different questions: location within the band structure and relative width of that structure. Preserve the percent versus fraction convention. A percent-B reading of 0.85 is not an 85% probability of reversal, and bandwidth is not an account-loss estimate.
| Measure | Calculation | Result |
|---|---|---|
| Mean | (1,990+2,000+2,010+2,000)/4 | 2,000 |
| Deviation | sqrt(200/4) | 7.0711 |
| Upper / lower | 2,000 ± 2×sqrt(50) | 2,014.1421 / 1,985.8579 |
| Percent-B at 2,010 | (price−lower)/(upper−lower) | 0.8536 |
| Bandwidth | (upper−lower)/middle | 1.4142% |
Do not turn two deviations into guaranteed coverage
The common interpretation that two standard deviations enclose about 95% of observations comes from particular distributional conditions. Rolling financial price levels are not automatically independent observations from a stationary normal distribution. The bands themselves also change as observations enter and leave the window. A price can remain near an upper band during a sustained advance, and a close outside it does not establish an immediate return to the average. Describe the observed location without importing an unsupported probability. If a strategy assumes mean reversion, that assumption needs separate evidence under its actual entry, exit and cost rules.
Separate a squeeze from a directional forecast
A narrow band structure indicates low dispersion under the selected calculation, compared with an explicitly chosen reference. It does not determine the direction or timing of the next expansion. Defining a squeeze after looking at a dramatic breakout can select a successful example retrospectively. Choose the width threshold, comparison period, trigger and failed-break treatment before evaluation. Check whether a changing mean, a gap or an unusual observation drives the width. A visually appealing squeeze is descriptive information; the research question is whether a fixed rule using it adds value beyond a simpler comparison under realistic execution assumptions.
Practice task: explain what the bands cannot tell you
Recalculate the mean, variance and both boundaries, then derive percent-B and bandwidth from the same unrounded values. Replace 2,010 with 2,030 and observe how the window’s mean and dispersion change together. Do not compare the new price against old bands unless the exercise explicitly freezes them at the previous decision time. Write a short report distinguishing a completed-bar band touch, an intrabar touch and a future reversal. Include the estimator, timing and threshold definition. Your final conclusion should identify the missing trading rule rather than presenting band contact as a complete decision.
Can you apply the idea?
Answer three questions, then check the explanation for every answer. You can repeat the check after reviewing the lesson.
Knowledge check: not attempted
Make this lesson part of your process.
Finish the reading and its practice task, then mark the lesson as completed.
0 of 100 lessons completed
Gold Trading Mastery
From gold market fundamentals to technical analysis, execution, quantitative research and AI. A structured 160-chapter course.
Explore the book →Continue the beginner course
What Is XAU/USD? Gold Trading Explained for Beginners →
How to Read Gold Candlestick Charts: A Beginner’s Guide →
Market, Limit and Stop Orders in Gold Trading →
Gold Trading Costs: Spread, Slippage and Financing →
Stop-Loss and Take-Profit in Gold: Beginner Essentials →
Your First Gold Trading Plan: Practise Before Going Live →
Gold Position Sizing: Calculate Exposure Before You Trade →
Gold Leverage and Margin: Understand the Difference →
Support and Resistance in Gold: Read Zones Without Guessing →
Gold and the Economic Calendar: CPI, Jobs and the Fed →
Multiple-Timeframe Gold Analysis: Context, Setup and Trigger →
Gold Trading Expectancy: Evaluate Results Beyond Win Rate →
Gold Trends and Ranges: Identify the Market Before the Setup →
Gold ATR for Beginners: Measure Movement, Not Direction →
Gold Breakouts and Failed Breaks: Define the Evidence →
Gold Trading Drawdown: Understand Losses and Recovery →
How to Backtest a Gold Trading Rule Without Hindsight →
The Gold Pre-Trade Checklist: Turn a Plan into a Decision →
Gold Liquidity and Trading Sessions: Study the Conditions →
Audit a Gold Trade: Quotes, Triggers and Actual Fills →
Multiple Gold Positions: Measure the Combined Exposure →
Partial Exits and Breakeven Stops: Follow the Arithmetic →
Small Samples in Gold Trading: Describe the Uncertainty →
Your Gold Trading Review: Version the Rule Before Testing Again →
Gold Weight and Purity: Calculate the Fine Gold Content →
Gold Premiums and Buyback: Calculate the Round-Trip Hurdle →
Allocated and Unallocated Gold: Understand the Ownership Claim →
Gold Benchmarks and Spot Quotes: Compare Like with Like →
Gold Returns in Your Currency: Separate Metal and FX Effects →
Gold Futures Tick Value: Translate Price Moves into Money →
Gold Futures Daily Settlement: Follow the Cash Through the Account →
Gold COT Reports: Read Positioning Without Inventing a Signal →
Gold ETFs: NAV, Market Price and Tracking Difference →
Gold in a Portfolio: Calculate Weight Drift and Rebalancing →
Gold Moving Averages: Read Smoothing Without Predicting the Future →
Gold RSI: Momentum Is Not a Reversal Promise →
Gold Volume: Distinguish Ticks, Contracts and Coverage →
Gold Heikin Ashi Charts: Separate Display Prices from Fills →
Gold Indicator Repainting: Distinguish Live Signals from Confirmed History →
Gold Backtests: When One Candle Touches Both Stop and Target →
Gold TradingView Alerts: Audit the Saved Script Snapshot →
Gold Signal Webhooks: Verify Delivery, Freshness and Duplicates →
Gold Trading Returns: Add Money, Compound Percentages →
Gold Account Performance: Separate Deposits from Trading Gains →
Gold Realized Volatility: Calculate the Statistic and Audit Its Assumptions →
Gold Correlation: Align Returns Before Interpreting the Relationship →
Gold Event Studies: Measure the Reaction Without Inventing the Cause →
Gold Strategy Robustness: Count the Experiments Behind the Winner →
Gold Stress Tests: Model Gaps, Liquidity and Tail Losses Together →
Gold Options at Expiry: Separate Payoff, Premium and Exercise →
Gold Option Delta and Gamma: Estimate Exposure Without Freezing It →
Gold Implied Volatility: Separate the Price of Uncertainty from Direction →
Gold Futures Rolls: Reconcile Contract P&L with a Continuous Chart →
Gold Mining Shares: Understand the Business Behind the Metal Exposure →
Gold VWAP: Define the Anchor, Price Input and Volume →
Gold MACD: Read the Line, Signal and Histogram as Different Comparisons →
Gold Donchian Channels: Use the Prior Window Without Circular Signals →
Gold Fibonacci Retracements: Audit the Anchors Before Trusting the Level →
Gold Position Accounting: Distinguish Net Exposure from Gross Tickets →
Gold Bracket Orders: Audit Partial Fills and Cancellation States →
Gold Trade Excursions: Measure MAE and MFE Without Rewriting the Past →
Gold Execution Shortfall: Reconcile Decisions, Fills and Unfilled Quantity →
Gold Strategy Monitoring: Separate Data Failures, Execution Drift and Method Decay →
Gold Open Interest: Follow the Contract Ledger Before Reading Sentiment →
Gold Order Books: Translate Displayed Depth into a Conditional Fill Estimate →
Gold Calendar Spreads: Calculate Relative-Maturity P&L and Leg Risk →
Gold Basis Risk: Explain Why a Futures Hedge Can Leave a Residual Loss →
Gold Lending and Lease Rates: Separate Metal Interest from Price Exposure →
Gold Assay and Authenticity: Separate a Purity Calculation from Evidence →
Gold Storage and Insurance: Reconcile the Inventory and the Protection →
Gold Inventory Hedging: Match Fine Ounces and Finance the Cash Path →
Gold and Currency Hedging: Separate Metal Exposure from the Conversion Leg →
Gold Capstone: Build One Report from Price, Basis, Costs and Liquidity →
Gold Profit Factor: Reconcile the Winning and Losing Dollars →
Gold Sharpe Ratios: Align Excess Returns, Frequency and Risk →
Gold Sortino Ratios: Define the Target and the Downside Denominator →
Gold Win Rates: Calculate a Confidence Interval and State Its Assumptions →
Gold Return Dependence: Keep the Sequence When Measuring Risk →
Gold Bootstrap Studies: Resample the Evidence Without Inventing New Markets →
Gold Walk-Forward Tests: Freeze Each Rule Before Its Next Evaluation →
Gold Research Universes: Keep Delisted Products and Historical Eligibility Visible →
Gold Performance Attribution: Separate Within-Condition Results from the Opportunity Mix →
Gold Performance Capstone: Audit a Claim from Signal Ledger to Account Equity →
Build a Gold Trading System: Write the Operating Charter Before the Signal →
Gold Setup Rules: Translate Chart Language into Testable Predicates →
Gold System States: Separate Eligibility, Submission, Exposure and Rearming →
Gold System Sizing: Reserve Risk and Check Whether a Trade Is Feasible →
Gold System Exits: Define Priority, Timeouts and Conflicting Events →
Release a Gold Paper System: Test the Runbook Before Increasing Exposure →
Gold Execution Hesitation: Distinguish a Missed Entry from a New Decision →
Gold Overtrading: Audit Eligibility Before Counting Activity →
Gold Losing Streaks: Prevent Recovery Pressure from Rewriting Risk →
Gold Rule Changes: Separate Emergency Repairs from Strategy Redesign →
Gold Trading Journals: Score Decision Quality Separately from Profit →
Gold Case Study: Audit a Trend-Continuation Trade from Context to Net Exit →
Gold Case Study: Accept a Failed Range Break Without Moving the Evidence →
Gold Case Study: Document a Valid No-Trade Decision Around a Scheduled Event →
Gold Case Study: Recover from a Lost Order Response Without Duplicating Exposure →
Gold Lesson 100: Complete the Paper-System Project and Defend Its Evidence →
Market Desk and position-risk calculator →
Position sizing explained → · Build a trading journal →
Lesson sources and further study
TradingView: Bollinger Bands definition and limitations
Core course references
CME Group: Gold Product Overview. Investor.gov: Types of Orders explains order concepts for stocks; check the execution rules of your specific gold instrument.
Gabriel Nicolaev — CyGuru · Published 7 November 2026. Educational material. Illustrative prices are not current quotes or trade recommendations.