Gold Position Sizing: Calculate Exposure Before You Trade
Calculate a gold position from a defined risk budget, stop distance and contract size, with worked examples and checks for costs and rounding.
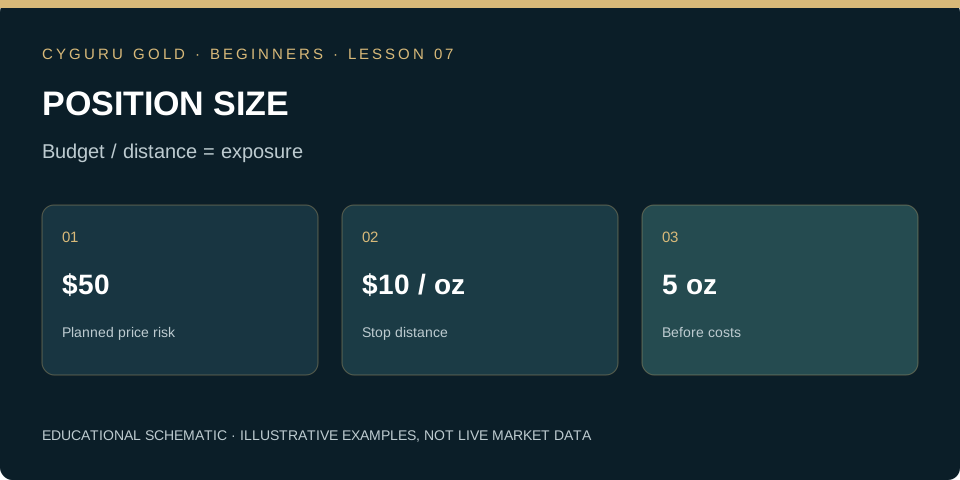
Start with the amount at risk, not the lot size
A platform makes selecting a quantity easy. The harder task is explaining why that quantity belongs in the plan. Begin with account equity, an explicitly chosen practice risk budget and the distance between the intended entry and the point of invalidation. These inputs answer different questions. Equity describes available capital; the budget describes a planned exposure boundary; the stop distance describes the trade idea. None establishes that the idea has a positive expectancy. A correctly sized trade can still be a poor trade.
Work through the units
Consider a hypothetical USD practice account with $10,000 equity and a $50 planned price-risk budget. If the intended entry is $2,000 per ounce and the stop trigger is $1,990, the distance is $10 per ounce. Dividing $50 by $10 per ounce gives five ounces of exposure. If, and only if, the selected broker contract represents 100 ounces per lot, five ounces equals 0.05 lots. These are illustrative inputs, not current prices or a recommended allocation. A contract using a different unit requires a different conversion.
Include costs and permitted increments
The five-ounce result allocates the whole $50 to the price distance. It leaves no allowance for separate commissions or adverse execution. If an illustrative $5 allowance is reserved for costs, the remaining $45 supports 4.5 ounces at the same stop distance. A platform permitting only one-ounce increments would require rounding down to four ounces. Check whether the calculation already incorporates bid and ask prices so that spread is not counted twice. A cost allowance is still an estimate; an ordinary stop does not guarantee the final loss.
Look at combined exposure
Three positions on the same gold instrument are not three independent sources of safety. If each expresses the same direction, an adverse move can affect all three together. Calculate their combined sensitivity and the planned losses at their respective exits. Include pending entry orders that could activate later. Available margin is a separate constraint: passing a margin check does not demonstrate that the combined risk fits the account. When the minimum tradable quantity exceeds the budget, skipping the trade is a valid result of the calculation.
Practice task: change one variable
Repeat the example with a $20 stop distance. Before costs, the same $50 budget now supports 2.5 ounces, not five. Then change the contract size while keeping the ounce exposure constant and calculate the new lot quantity. Record the units beside every number. Use the Market Desk calculator to check the basic arithmetic, then compare its assumptions with the provider’s specification. The task is complete when you can explain both the intended price loss and the circumstances under which the realized loss could be larger.
Can you apply the idea?
Answer three questions, then check the explanation for every answer. You can repeat the check after reviewing the lesson.
Knowledge check: not attempted
Make this lesson part of your process.
Finish the reading and its practice task, then mark the lesson as completed.
0 of 24 lessons completed
Gold Trading Mastery
From gold market fundamentals to technical analysis, execution, quantitative research and AI. A structured 160-chapter course.
Explore the book →Turn risk into position size.
Work through a hypothetical linear gold position in a USD account. Replace the example values with the contract specifications shown by your broker.
Continue the beginner course
What Is XAU/USD? Gold Trading Explained for Beginners →
How to Read Gold Candlestick Charts: A Beginner’s Guide →
Market, Limit and Stop Orders in Gold Trading →
Gold Trading Costs: Spread, Slippage and Financing →
Stop-Loss and Take-Profit in Gold: Beginner Essentials →
Your First Gold Trading Plan: Practise Before Going Live →
Gold Leverage and Margin: Understand the Difference →
Support and Resistance in Gold: Read Zones Without Guessing →
Gold and the Economic Calendar: CPI, Jobs and the Fed →
Multiple-Timeframe Gold Analysis: Context, Setup and Trigger →
Gold Trading Expectancy: Evaluate Results Beyond Win Rate →
Gold Trends and Ranges: Identify the Market Before the Setup →
Gold ATR for Beginners: Measure Movement, Not Direction →
Gold Breakouts and Failed Breaks: Define the Evidence →
Gold Trading Drawdown: Understand Losses and Recovery →
How to Backtest a Gold Trading Rule Without Hindsight →
The Gold Pre-Trade Checklist: Turn a Plan into a Decision →
Gold Liquidity and Trading Sessions: Study the Conditions →
Audit a Gold Trade: Quotes, Triggers and Actual Fills →
Multiple Gold Positions: Measure the Combined Exposure →
Partial Exits and Breakeven Stops: Follow the Arithmetic →
Small Samples in Gold Trading: Describe the Uncertainty →
Your Gold Trading Review: Version the Rule Before Testing Again →
Market Desk and position-risk calculator →
Position sizing explained → · Build a trading journal →
Lesson sources and further study
CME Group: Proper Position Size
Core course references
CME Group: Gold Product Overview. Investor.gov: Types of Orders explains order concepts for stocks; check the execution rules of your specific gold instrument.
CYGURU GOLD editorial · Published 27 October 2026. Educational material. Illustrative prices are not current quotes or trade recommendations.